

Ijraset Journal For Research in Applied Science and Engineering Technology
Automatic Adjustable Rear-View Mirror Using Servo Motor and Arduino for Bikes
Authors: Shaunak Sunil Karvir, Kartik Mahadeo Palve, Kashish Vitthal Vidhate, Limay Kamalsing Karsi, Nikhil Kawdu Karmankar , Amruta Bhawarthi
DOI Link: https://doi.org/10.22214/ijraset.2023.57169
Certificate: View Certificate
Abstract
The Automatic Adjustable Rear-View Mirror (AARM) system utilizing a servo motor and Arduino for bikes is an innovative solution aimed at enhancing rider safety and convenience. This is an automotive aid for riders, as many times we see that side glass or rear view mirrors of two wheelers are maximum time disorientated and riders barely takes any precaution against it. This system employs servo-controlled mechanisms to enable automatic adjustment of the rear-view mirror angles based on real-time riding conditions. By integrating an Arduino microcontroller, the AARM system achieves dynamic responsiveness to varying situations, providing riders with optimal visibility without manual intervention.
Introduction
I. INTRODUCTION
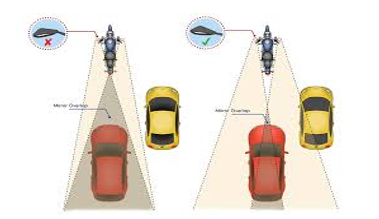
Motorcycle riders often face challenges in maintaining proper rear-view visibility, as the ideal mirror angle can change depending on factors such as road conditions, speed, and posture. The Automatic Adjustable Rear-View Mirror system addresses this issue by utilizing servo motors controlled by an Arduino microcontroller. This technology enables real-time adjustments, ensuring that riders have an optimal view of the road behind them without diverting their attention from riding.
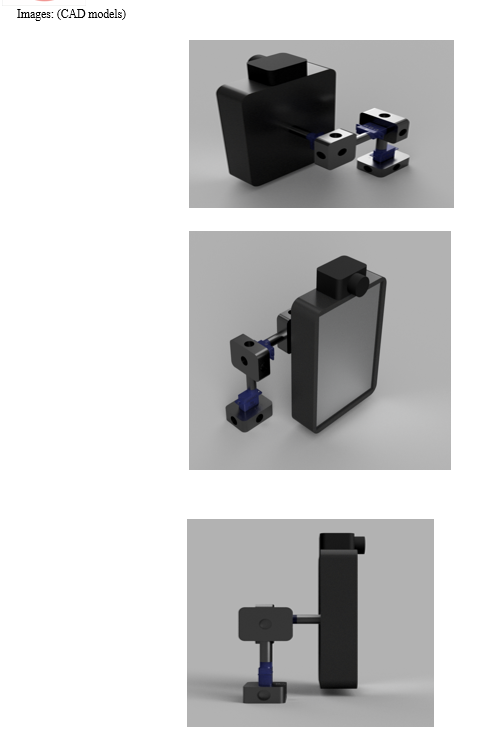
II. STRUCTURE
- Servo Motor: This component is responsible for executing the adjustments of the rear-view mirror. It receives commands from the Arduino microcontroller and translates them into rotational motion, which is then converted to linear motion through the linkage system.
- Linkage System: This structure consists of mechanical components that transmit the rotational motion of the servo motor into linear motion, thereby adjusting the position of the rear-view mirror.
- Arduino Microcontroller: The brain of the system, the Arduino processes inputs from sensors and calculates the optimal mirror angle based on real-time data. It then sends commands to the servo motor for mirror adjustment.
A. Inner mechanism
The inner mechanism involves the interaction between the servo motor and the linkage system. When the Arduino sends a signal to the servo motor, it rotates to a specific angle, which is translated into linear motion by the linkage system. This linear motion is then used to adjust the position of the rear-view mirror.
B. Outer Mechanism
The outer mechanism encompasses the entire AARM system, including the servo motor, linkage system, rear-view mirror, and Arduino microcontroller. It interfaces with the bike's existing mirror mount, allowing for seamless integration and ensuring that the system does not interfere with the bike's normal operation.
III. MATERIAL USED & PROCEDURE
A. Components
- Servo Motor: A servo motor is a type of rotary actuator that allows for precise control of angular position. It consists of a motor, feedback system, and control circuitry. In the AARM system, the servo motor is responsible for adjusting the rear-view mirror's position.
- Linkage System: The linkage system is a mechanical arrangement of components that translates the rotational motion of the servo motor into linear motion. It typically includes arms, joints, and other connecting elements that allow for controlled movement.
- Rear-View Mirror Mount: This is the fixture that holds the rear-view mirror in place on the motorcycle. It provides a stable attachment point for the mirror and serves as the interface for the servo motor and linkage system.
- Rear-View Mirror: The rear-view mirror itself is a reflective surface that allows the rider to see what is happening behind them. It is attached to the mirror mount and is the component that undergoes adjustment.
- Arduino Microcontroller: An Arduino microcontroller is a programmable electronic device that serves as the brain of the AARM system. It processes inputs from sensors or other sources, performs calculations, and sends commands to the servo motor for mirror adjustment.
- Sensors (Optional): Depending on the specific implementation, additional sensors may be used to provide input to the Arduino for making real-time adjustments. For example, sensors for speed, tilt, or light conditions could be integrated to optimize mirror angles.
- Power Supply: This component provides the necessary electrical power to operate the servo motor and Arduino. It could be a battery or a direct power source from the motorcycle's electrical system.
- Control Circuitry: The control circuitry of the servo motor manages the signals received from the Arduino and ensures that the motor moves to the desired position accurately.
- Program Code: The program code refers to the set of instructions written for the Arduino microcontroller. It includes algorithms for processing sensor data (if used) and determining the optimal mirror angles based on the current riding conditions.
- Mounting Hardware: Various screws, bolts, brackets, and other fasteners are needed to secure the components in place on the motorcycle. These ensure that the AARM system is sturdily attached and doesn't interfere with the bike's operation.
- Wiring and Connectors: These components facilitate the electrical connections between the servo motor, Arduino, sensors (if used), and power supply. Proper wiring ensures reliable operation of the AARM system.
- User Interface (Optional): In some implementations, a user interface such as buttons, switches, or a display may be included to allow the rider to manually override or fine-tune the mirror adjustments
B. Tools
- Screwdrivers: Phillips and flathead screwdrivers will be necessary for assembling and securing components.
- Wrenches: Various sizes of wrenches may be needed to tighten nuts and bolts.
- Pliers: Needle-nose pliers can be useful for holding and manipulating small parts.
- Wire Strippers and Cutters: These tools are essential for preparing and connecting electrical wires.
- Soldeing Iron and Solder If you need to solder connections, a soldering iron and solder are necessary for creating secure electrical joints.
- This includes the servo motor, Arduino board, rear-view mirror, mirror mount, linkage system, sensors (if used), wires, resistors, capacitors, and any other electronic components specified in your design.
- Power Supply (Battery or Adapter): Depending on your specific design, you'll need a power source to operate the system.
- Workspace and Lighting: A well-lit and organized workspace will help you work efficiently and safely
- Drill and Drill Bits: A drill may be needed for making holes in mounting brackets or other components.
- Measuring Tools: Calipers or rulers are useful for accurately measuring distances and dimensions.
- Multimeter: A multimeter is essential for testing electrical connections, checking voltage, and troubleshooting.
- Hot Glue Gun (Optional): A hot glue gun can be used for securing components in place or for insulation.
- File or Sandpaper: These can be used for smoothing and shaping components or edges if necessary.
- Safety Equipment: Safety glasses, gloves, and other protective equipment should be worn as needed to ensure safe operation.
- Breadboard and Jumper Wires: These can be used for prototyping and testing circuits before final assembly.
- PCB (Printed Circuit Board) and Etching Kit (Optional): If you plan to create a custom PCB for the circuit, you'll need the necessary materials for etching and assembling it.
- Computer with Arduino IDE: You'll need a computer to write and upload the Arduino code using the Arduino Integrated Development Environment (IDE),
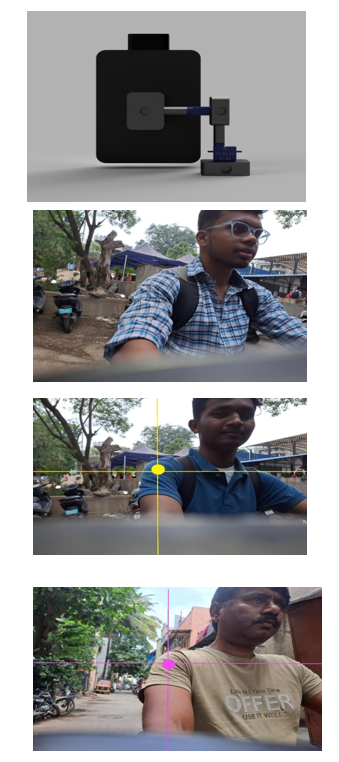
The code is provided below.
import cv2
import media pipe as mp
import math
from pyfirmata import *
from pyfirmata import util
port = 'COM3'
servox = 9
servoy = 10
board = Arduino(port)
board.digital[servox].mode = SERVO
board.digital[servoy].mode = SERVO
def movx(angle):
board. digital[servox].write(angle)
time.sleep(0.05)
def movy(angle):
board.digital[servoy].write(angle)
time.sleep(0.05)
# Function to draw a point with a specific color
def draw_point(img, color, center):
cv2.circle(img, center, 5, color, -1)
# Function to calculate the distance between two points
def calculate_distance(pt1, pt2):
return math.sqrt((pt2[0] - pt1[0]) ** 2 + (pt2[1] - pt1[1]) ** 2)
def map_value(x, in_min, in_max, out_min, out_max, base, top):
if base == 1:
movx((x - in_min) * (out_max - out_min) // (in_max - in_min) + out_min)
elif top == 1:
movy((x - in_min) * (out_max - out_min) // (in_max - in_min) + out_min)
# Initialize MediaPipe's holistic model
mp_holistic = mp.solutions.holistic.Holistic(
min_detection_confidence=0.5, min_tracking_confidence=0.5)
# camera set up if not used gets little or more, glitchy
width = 320
height = 240
cap = cv2.VideoCapture(0, cv2.CAP_DSHOW)
cap.set(cv2.CAP_PROP_FRAME_HEIGHT, height)
cap.set(cv2.CAP_PROP_FRAME_WIDTH, width)
cap.set(cv2.CAP_PROP_FPS, 30)
cap.set(cv2.CAP_PROP_FOURCC, cv2.VideoWriter_fourcc(*'MJPG'))
movx(90)
movy(90)
# # Create a VideoCapture object to access the external camera
# cap = cv2.VideoCapture(1)
# Get the frame width and height
frame_width = int(cap.get(cv2.CAP_PROP_FRAME_WIDTH))
frame_height = int(cap.get(cv2.CAP_PROP_FRAME_HEIGHT))
# Get the reference point from the user as a percentage of the screen's width and height
# ref_x_percent = float(
# input("Enter the reference point X-coordinate as a percentage (0-100): "))
# ref_y_percent = float(
# input("Enter the reference point Y-coordinate as a percentage (0-100): "))
ref_x_percent = 50
ref_y_percent = 50
# Calculate the reference point in pixels
reference_point = (int(ref_x_percent / 100 * frame_width),
int(ref_y_percent / 100 * frame_height))
x_mov = 0
y_mov = 0
while True:
# Read a frame from the camera feed
ret, frame = cap.read()
# Convert the frame to RGB format
frame_rgb = cv2.cvtColor(frame, cv2.COLOR_BGR2RGB)
# Use MediaPipe's holistic model to process the frame
results = mp_holistic.process(frame_rgb)
# Extract the right shoulder keypoint from the results
if results.pose_landmarks is not None:
# Extract the right shoulder keypoint
right_shoulder = (int(results.pose_landmarks.landmark[mp.solutions.holistic.PoseLandmark.RIGHT_SHOULDER].x * frame_width),
int(results.pose_landmarks.landmark[mp.solutions.holistic.PoseLandmark.RIGHT_SHOULDER].y * frame_height))
# Draw the right shoulder point
draw_point(frame, (0, 0, 255), right_shoulder)
# Display the x and y coordinates of the right shoulder on the frame
text = "ShoPos: ({}, {})".format(
right_shoulder[0], right_shoulder[1])
cv2.putText(frame, text, (10, 30),
cv2.FONT_HERSHEY_SIMPLEX, 1, (0, 0, 255), 2)
# Calculate the movement required to bring the shoulder to the reference point
x_movement = reference_point[0] - right_shoulder[0]
y_movement = reference_point[1] - right_shoulder[1]
# Display the movement required to bring the shoulder to the reference point
text = "MovTo: ({}, {}) pixels".format(x_movement, y_movement)
cv2.putText(frame, text, (10, 70),
cv2.FONT_HERSHEY_SIMPLEX, 1, (0, 0, 255), 2)
it = util.Iterator(board)
it.start()
# map_value(x_movement, 0, width, 0, 180, 1, 0)
# map_value(y_movement, 0, height, 0, 180, 0, 1)
if((x_movement < 0) and ()):
x_movement = -1 * x_movement
movx(90-x_movement//2.35)
elif (x_movement >= 0):
movx(90+x_movement // 2.35)
if (y_movement < 0):
y_movement = -1 * y_movement
movy(90+y_movement // 2.35)
elif (y_movement >=0 ):
movy(90-y_movement // 2.35)
# Draw the reference point on the frame
draw_point(frame, (0, 255, 0), reference_point)
# Display the resulting frame
cv2.imshow('Shoulder Detected', frame)
# Check for the 'q' key to exit the loop
if cv2.waitKey(1) & 0xFF == ord('q'):
break
else:
movx(90)
movy(90)
# Release the VideoCapture object and close all windows
cap.release()
cv2.destroyAllWindows()
To run the code run prettier or any other indentation extension to indent the code correctly
IV. DECLERATIONS
A. Ethics Approval and Consent to Participate
Not Applicable
B. Consent for Publication
Not Applicable
C. Competing Interests
The authors declare that they have no competing interests.
D. Funding
Not Applicable
E. Authors' Contributions
NKK and LKK did all collection of all materials.
KMP and SSK measurements, marking and cutting, KVV 3D model and assembly.
V. ACKNOWLEDGEMENTS
We would like to thank our B.R.A.C.T.’s Vishwakarma Institute of Technology, Pune, our teachers and especially Prof Amruta Bhawarthi who provided us with valuable guidance regarding analysing the problem as well as possible solutions.
Copyright
Copyright © 2023 Shaunak Sunil Karvir, Kartik Mahadeo Palve, Kashish Vitthal Vidhate, Limay Kamalsing Karsi, Nikhil Kawdu Karmankar , Amruta Bhawarthi. This is an open access article distributed under the Creative Commons Attribution License, which permits unrestricted use, distribution, and reproduction in any medium, provided the original work is properly cited.

Download Paper
Paper Id : IJRASET57169
Publish Date : 2023-11-29
ISSN : 2321-9653
Publisher Name : IJRASET
DOI Link : Click Here
 Submit Paper Online